 |
||||
Making Your Own Dining Fly With Easy InstructionsWhen we go camping, the dining fly is a basic piece of equipment. During the warmer camping season it provides a comfortable shaded area for all of us to congregate under, and we usually place it right over our camping kitchen. It also provides us a place to take cover if it rain.
When family camping, we use one large dining fly which the camping kitchen and all of our chairs will fit under. At our Scouting campouts, we have one over the adult patrol, and then one over every youth patrol, which the boys put up themselves. All of these are simply made with tarps, poles, ropes, and stakes that easily store and transport. Ours cost around $30 to put together, and has lasted years. It far stronger and sturdier than the pop-up shade tents in the same price range. Cheap Camping Equipment!!!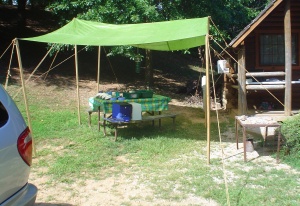 My husband, the King of Cheap Camping Equipment (and creativity) has been putting up this kind of a dining fly for years. He has written an easy guide, with pictures of every step, to guide you on how to put together this equipment and then set it up. My Husband's Method
|
||||
|
The Tarp
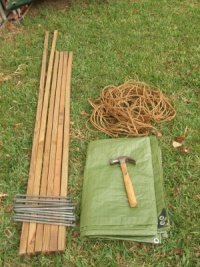
Camping tarps can be purchased cheaply at most hardware stores, including Home Depot or Lowes. Wal-mart and Target also have them. The tarp size for this set up can be up to 10 by 20. The tarp will need to have grommets at each corner and midway on the 2 long edges.
Most tarps are manufactured with the grommets already in place, however, you can also install your own with a simple grommet installation tool. If you are able to find a tarp with a cord sewn into the edge of the tarp this is a better choice than one without as the cord adds strength where you need it most.
Setting Up The Poles
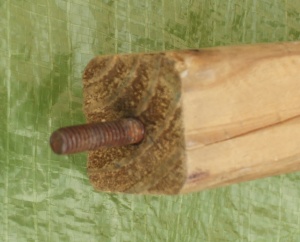
All six poles I use are made of pressure treated 2X2s. I insert a ¼ stud that is 4 long into the top of each pole. This is what passes through the grommet on the tarp and is where you tie the guy ropes.
The four short poles are for the corners. I cut mine to a 6 length which allows any of us to walk under any side of the fly with ease. The two longer poles are for the peak.
I buy the 2X2s 8 long and this gives the fly a nice pitch for any rain to run off. You can size your poles to suit your personal needs including the storage room you have available and considering the way you have to transport them. We carry ours on the roof rack of our minivan.
Staking It Down
Selecting stakes for your dining fly is one of the most important tasks you will have when designing your setup. Matching the stakes to the soil is very important.
In our local area we have limerock within inches of the surface of the soil. Plastic stakes are completely useless in this situation. When we go to the beach we have a very sandy soil. Here plastic stakes are one of the best choices. The point is you need to plan for the soil you will be setting up on.
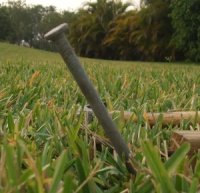
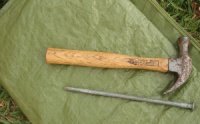
We bought 12 long galvanized nails at Home Depot for use in the limerock, as shown to the right.
Another inexpensive alternative to the plastic stakes for use in very soft soils is to buy 1X1 grade stakes. These are the one inch square wooden stakes you might see on a construction site with the plastic flags. Cutting the stakes to a length of 16-18 and cutting a notch for the rope on the top end works great in sandy soil.
Guy Lines Complete The Picture And Hold It Tight
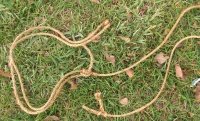
The final element you need is the guy rope. Each pole takes two guy ropes. Each guy rope needs to be long enough to run from the top of the pole to the ground at a 45 degree angle and be tied at both ends. For 6 poles a 10 rope will work. For 8 poles a 12 rope is needed. This is a total of 85 of rope. You can purchase this at most stores that sell hardware, or camping supplies.
We use ¼ manila rope. While synthetic ropes are stronger, natural fiber ropes stretch less under strain. This means dining flies set up with natural fiber ropes are less likely to blow down due to the ropes stretching and the tarp fluttering off the poles.
The ends of the ropes need to be whipped to prevent the rope from unraveling. This can be done by wrapping the last ¼ of the rope with a light sting such as dental floss or kite string. The camping knots page discusses how to whip rope.
Learn To Tie Some Camping Knots To Help You Put Up Your Dining Fly
Return To Your-Camping-Guidebook.com Home Page From Dining Fly Equipment List
Burning Issues
"Around The Campfire"
- See the latest in camping conveniences to make your camping trip more comfortable, safer, and fun for all.
- Break out of your camping meal rut...receive great camping recipes you can enjoy whether at home or when eating outdoors.
- Discover great new places to camp from coast to coast.
Can't Find It?
Search This Site:

[?] Keep up with the latest additions to this site as they are added by subscribing to this site's RSS Feed


Copyright©
2007-2009. Your-Camping-Guidebook.com